本文通过模拟搭建容器网络来了解其原理。
network namespace
众所周知,容器就是进程,只不过被隔离在 Linux 的各种 namespace中,关于网络的 namespace 就是 network namespace。
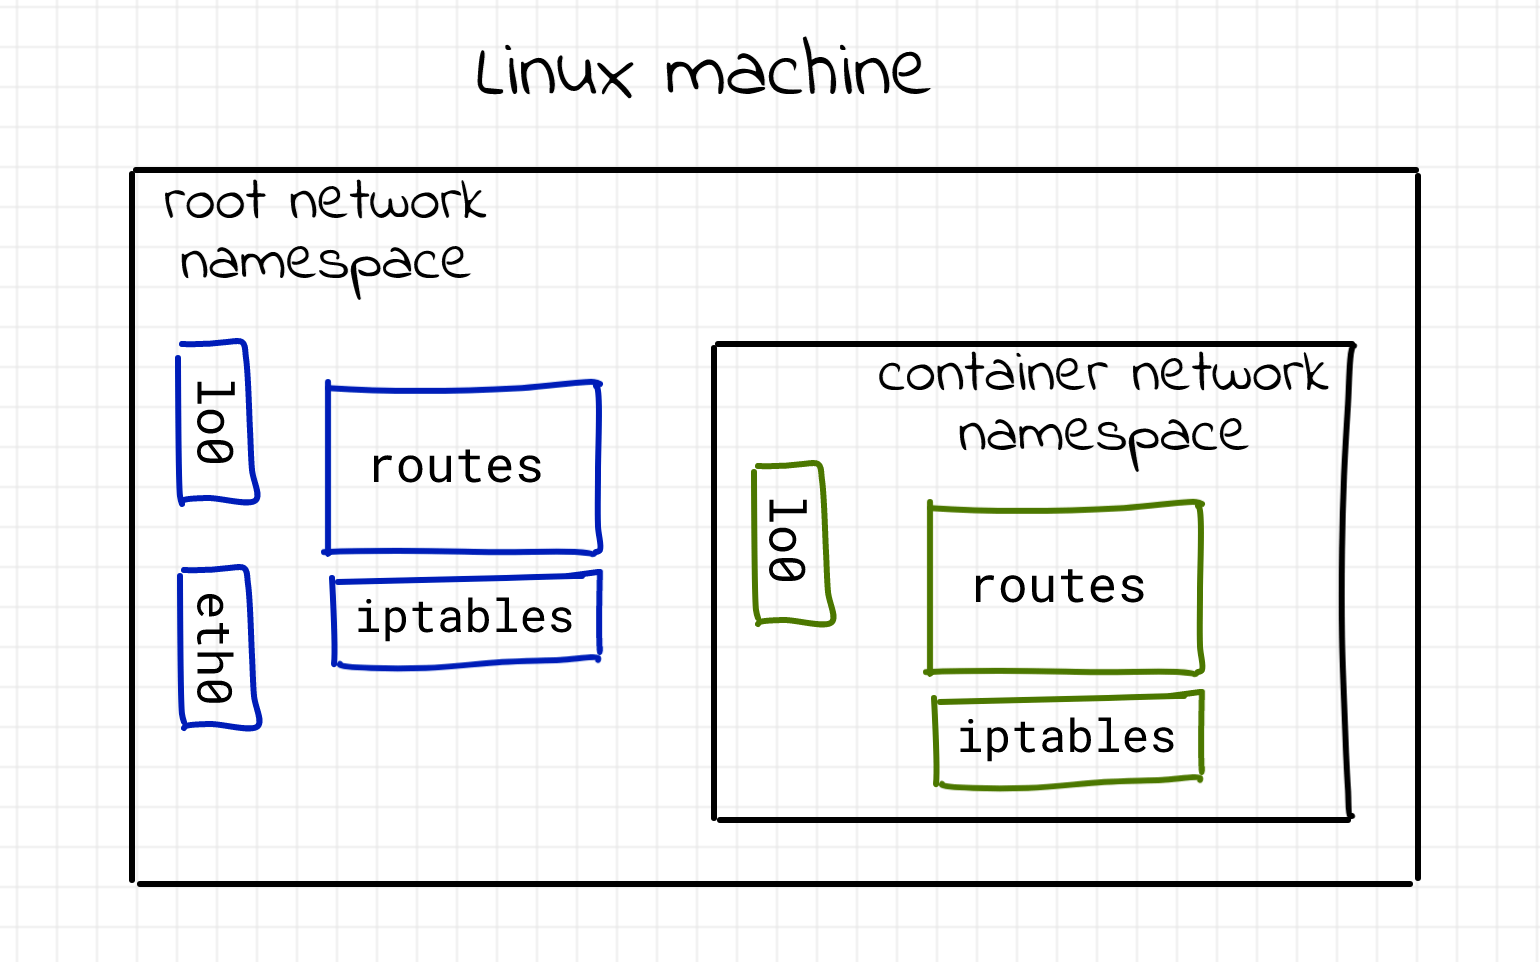
Host 上有一个 root network namespace,它有独立的路由表、iptables、网卡等。而容器的 network namespace 也有这些东西,如下图:
你可以新建一个 network namespace:
1
2
3
|
$ sudo ip netns add netns0
$ sudo ip netns show
netns0
|
新建的 network namespace 有一个对应的文件 /var/run/netns/<namespace> (不过 docker 不会创建文件),你可以通过 nsenter 进入来执行命令
1
2
3
4
5
6
|
$ sudo nsenter --net=/var/run/netns/netns0 bash
$ ip link
1: lo: <LOOPBACK> mtu 65536 qdisc noop state DOWN mode DEFAULT group default qlen 1000
    link/loopback 00:00:00:00:00:00 brd 00:00:00:00:00:00
# 记得 exit 来退出 namespace
$ exit
|
可以发现 namespace 中只有一张 loopback 网卡。
上述命令你也可以通过 sudo ip netns exec <namespace> ... 来达到同样效果。
1
2
3
4
|
$ sudo ip netns exec netns0 ip link
# 或者
$ sudo ip netns exec netns0 bash
$ ip link
|
容器连通容器
你可以新建两个容器(namespace),创建一个交换机(bridge 设备),给容器接一根网线( veth 设备)到交换机上,这样他们就能够互相通信。
新建 netns0 容器,添加 veth (网线)设备:
1
2
3
4
|
$ sudo ip netns add netns0
$ sudo ip link add veth0 type veth peer name ceth0
$ sudo ip link set veth0 up
$ sudo ip link set ceth0 netns netns0
|
假想 veth 设备是一根网线,一头 veth0 在 root namespace,一头 ceth0 在 netns0 namespace。
把容器内的 peer 拉起来,并分配一个 IP 地址:
1
2
3
4
5
|
$ sudo nsenter --net=/var/run/netns/netns0
$ ip link set lo up
$ ip link set ceth0 up
$ ip addr add 172.18.0.10/16 dev ceth0
$ exit
|
同理新建 netns1 容器,做上面类似的工作:
 1
 2
 3
 4
 5
 6
 7
 8
 9
10
|
$ sudo ip netns add netns1
$ sudo ip link add veth1 type veth peer name ceth1
$ sudo ip link set veth1 up
$ sudo ip link set ceth1 netns netns1

$ sudo nsenter --net=/var/run/netns/netns1
$ ip link set lo up
$ ip link set ceth1 up
$ ip addr add 172.18.0.20/16 dev ceth1
$ exit
|
创建一个 br0 bridge 设备(交换机),并拉起来:
1
2
|
$ sudo ip link add br0 type bridge
$ sudo ip link set br0 up
|
把刚才创建的两个网线插到交换机上:
1
2
|
$ sudo ip link set veth0 master br0
$ sudo ip link set veth1 master br0
|
然后测试它们之间是否能互相 ping 通:
1
2
3
4
5
|
$ sudo nsenter --net=/var/run/netns/netns0
$ ping -c 2 172.18.0.20
PING 172.18.0.20 (172.18.0.20) 56(84) bytes of data.
64 bytes from 172.18.0.20: icmp_seq=1 ttl=64 time=0.259 ms
64 bytes from 172.18.0.20: icmp_seq=2 ttl=64 time=0.051 ms
|
1
2
3
4
5
|
$ sudo nsenter --net=/var/run/netns/netns1
$ ping -c 2 172.18.0.10
PING 172.18.0.10 (172.18.0.10) 56(84) bytes of data.
64 bytes from 172.18.0.10: icmp_seq=1 ttl=64 time=0.037 ms
64 bytes from 172.18.0.10: icmp_seq=2 ttl=64 time=0.089 ms
|
而它们也能发现彼此:
1
2
3
4
5
6
7
8
9
|
$ sudo nsenter --net=/var/run/netns/netns0
$ ip neigh
172.18.0.20 dev ceth0 lladdr 6e:9c:ae:02:60:de STALE
$ exit

$ sudo nsenter --net=/var/run/netns/netns1
$ ip neigh
172.18.0.10 dev ceth1 lladdr 66:f3:8c:75:09:29 STALE
$ exit
|
容器连通 root namespace
好了,通过前面的一番操作,两个容器之间的通信建立了。
但是你是无法 ping 通 host 的(root namespace eth0 网卡)的:
1
2
3
|
$ sudo nsenter --net=/var/run/netns/netns0
$ ping 10.0.2.15  # eth0 address
connect: Network is unreachable
|
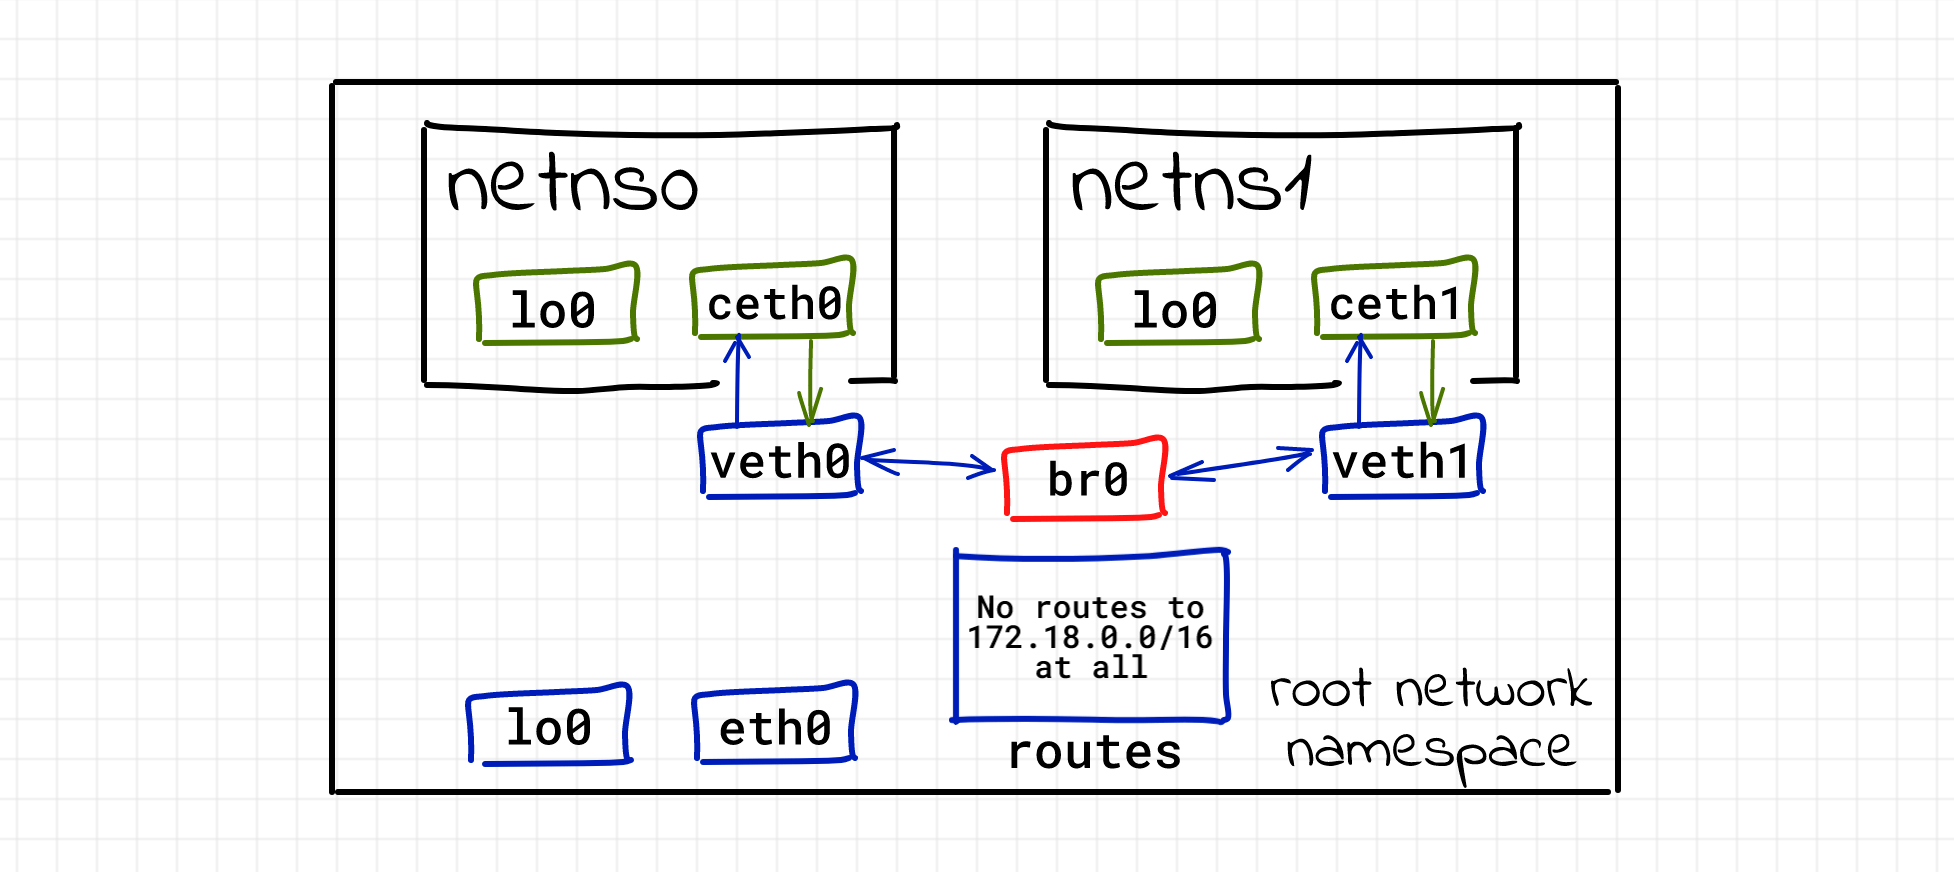
而 host 也是无法 ping 通容器的:
1
2
3
4
|
$ ping -c 2 172.18.0.10
PING 172.18.0.10 (172.18.0.10) 56(84) bytes of data.
From 213.51.1.123 icmp_seq=1 Destination Net Unreachable
From 213.51.1.123 icmp_seq=2 Destination Net Unreachable
|
你需要给 br0 设备分配一个 IP 地址:
1
|
$ sudo ip addr add 172.18.0.1/16 dev br0
|
这条命令也会在 host 上添加一条路由规则,让前往 172.18.0.0/16 的 IP 包走 br0 出去:
1
2
3
|
$ ip route
# ... omitted lines ...
172.18.0.0/16 dev br0 proto kernel scope link src 172.18.0.1
|
然后就通了:
1
2
3
4
|
$ ping -c 2 172.18.0.10
PING 172.18.0.10 (172.18.0.10) 56(84) bytes of data.
64 bytes from 172.18.0.10: icmp_seq=1 ttl=64 time=0.036 ms
64 bytes from 172.18.0.10: icmp_seq=2 ttl=64 time=0.049 ms
|
但是容器 ping host 还是不通的,需要为其添加路由规则:
1
2
3
4
5
6
|
$ sudo nsenter --net=/var/run/netns/netns0
$ ip route add default via 172.18.0.1
$ ping -c 2 10.0.2.15
PING 10.0.2.15 (10.0.2.15) 56(84) bytes of data.
64 bytes from 10.0.2.15: icmp_seq=1 ttl=64 time=0.036 ms
64 bytes from 10.0.2.15: icmp_seq=2 ttl=64 time=0.053 ms
|
于是就形成了如下拓扑:

容器连通外界
到这里,你还是不能够从容器连通外部世界的:
1
2
3
|
$ sudo nsenter --net=/var/run/netns/netns0
$ ping 223.5.5.5
...
|
这是因为你的包虽然通过容器的路由表发给了 br0,而 br0 又通过 root namespace 的路由表发给了它的路由器,但是,响应的包是没有办法返回给容器的,因为容器的地址不在它们的路由表内,它压根就不知道容器的子网。
这个时候就需要为来自容器子网 172.18.0.0/16 的 IP 包做一次 Masquerade(还记得吗,这是 SNAT 的一种特殊形式):
1
|
$ sudo iptables -t nat -A POSTROUTING -s 172.18.0.0/16 ! -o br0 -j MASQUERADE
|
然后你试试,这就通了:
1
2
3
4
5
|
$ sudo nsenter --net=/var/run/netns/netns0
$ ping -c 2 223.5.5.5
PING 223.5.5.5 (223.5.5.5) 56(84) bytes of data.
64 bytes from 223.5.5.5: icmp_seq=1 ttl=61 time=43.2 ms
64 bytes from 223.5.5.5: icmp_seq=2 ttl=61 time=36.8 ms
|
容器端口发布
现在模拟一下 docker 的端口发布,即通过 host 的端口访问到容器端口。
下面在容器内启动一个 http 服务器监听 5000 端口:
1
2
|
$ sudo nsenter --net=/var/run/netns/netns0
$ python3 -m http.server --bind 172.18.0.10 5000
|
你在 host 上访问是可以的:
1
2
3
4
|
# From root namespace
$ curl 172.18.0.10:5000
<!DOCTYPE HTML PUBLIC "-//W3C//DTD HTML 4.01//EN" "http://www.w3.org/TR/html4/strict.dtd">
# ... omitted lines ...
|
但是如果你访问 <host ip>:5000 是不可以的:
1
2
|
$ curl http://10.0.2.15:5000
curl: (7) Failed to connect to 10.0.2.15 port 5000: Connection refused
|
通过 iptables 发布端口:
1
2
3
4
5
|
# 为来自外部的流量做 DNAT
$ sudo iptables -t nat -A PREROUTING -d 10.0.2.15 -p tcp -m tcp --dport 5000 -j DNAT --to-destination 172.18.0.10:5000

# 为来自 host 自己的流量做 DNAT(因为本地流量不会经过 PREROUTING chain)
$ sudo iptables -t nat -A OUTPUT -d 10.0.2.15 -p tcp -m tcp --dport 5000 -j DNAT --to-destination 172.18.0.10:5000
|
然后再启用 br_netfilter 模块(iptables 可以拦截 bridge 流量了):
1
|
sudo modprobe br_netfilter
|
最后测试一下,通了:
1
2
3
|
curl http://10.0.2.15:5000
<!DOCTYPE HTML PUBLIC "-//W3C//DTD HTML 4.01//EN" "http://www.w3.org/TR/html4/strict.dtd">
# ... omitted lines ...
|
docker 网络模式
host 模式:容器用的就是 root network namespacenone 模式:在自己的 namespace 里,但是没有添加 vethbridge 模式:就是我们之前模拟的过程
参考资料
评论